How to Get Great Shots of Antelope Canyon
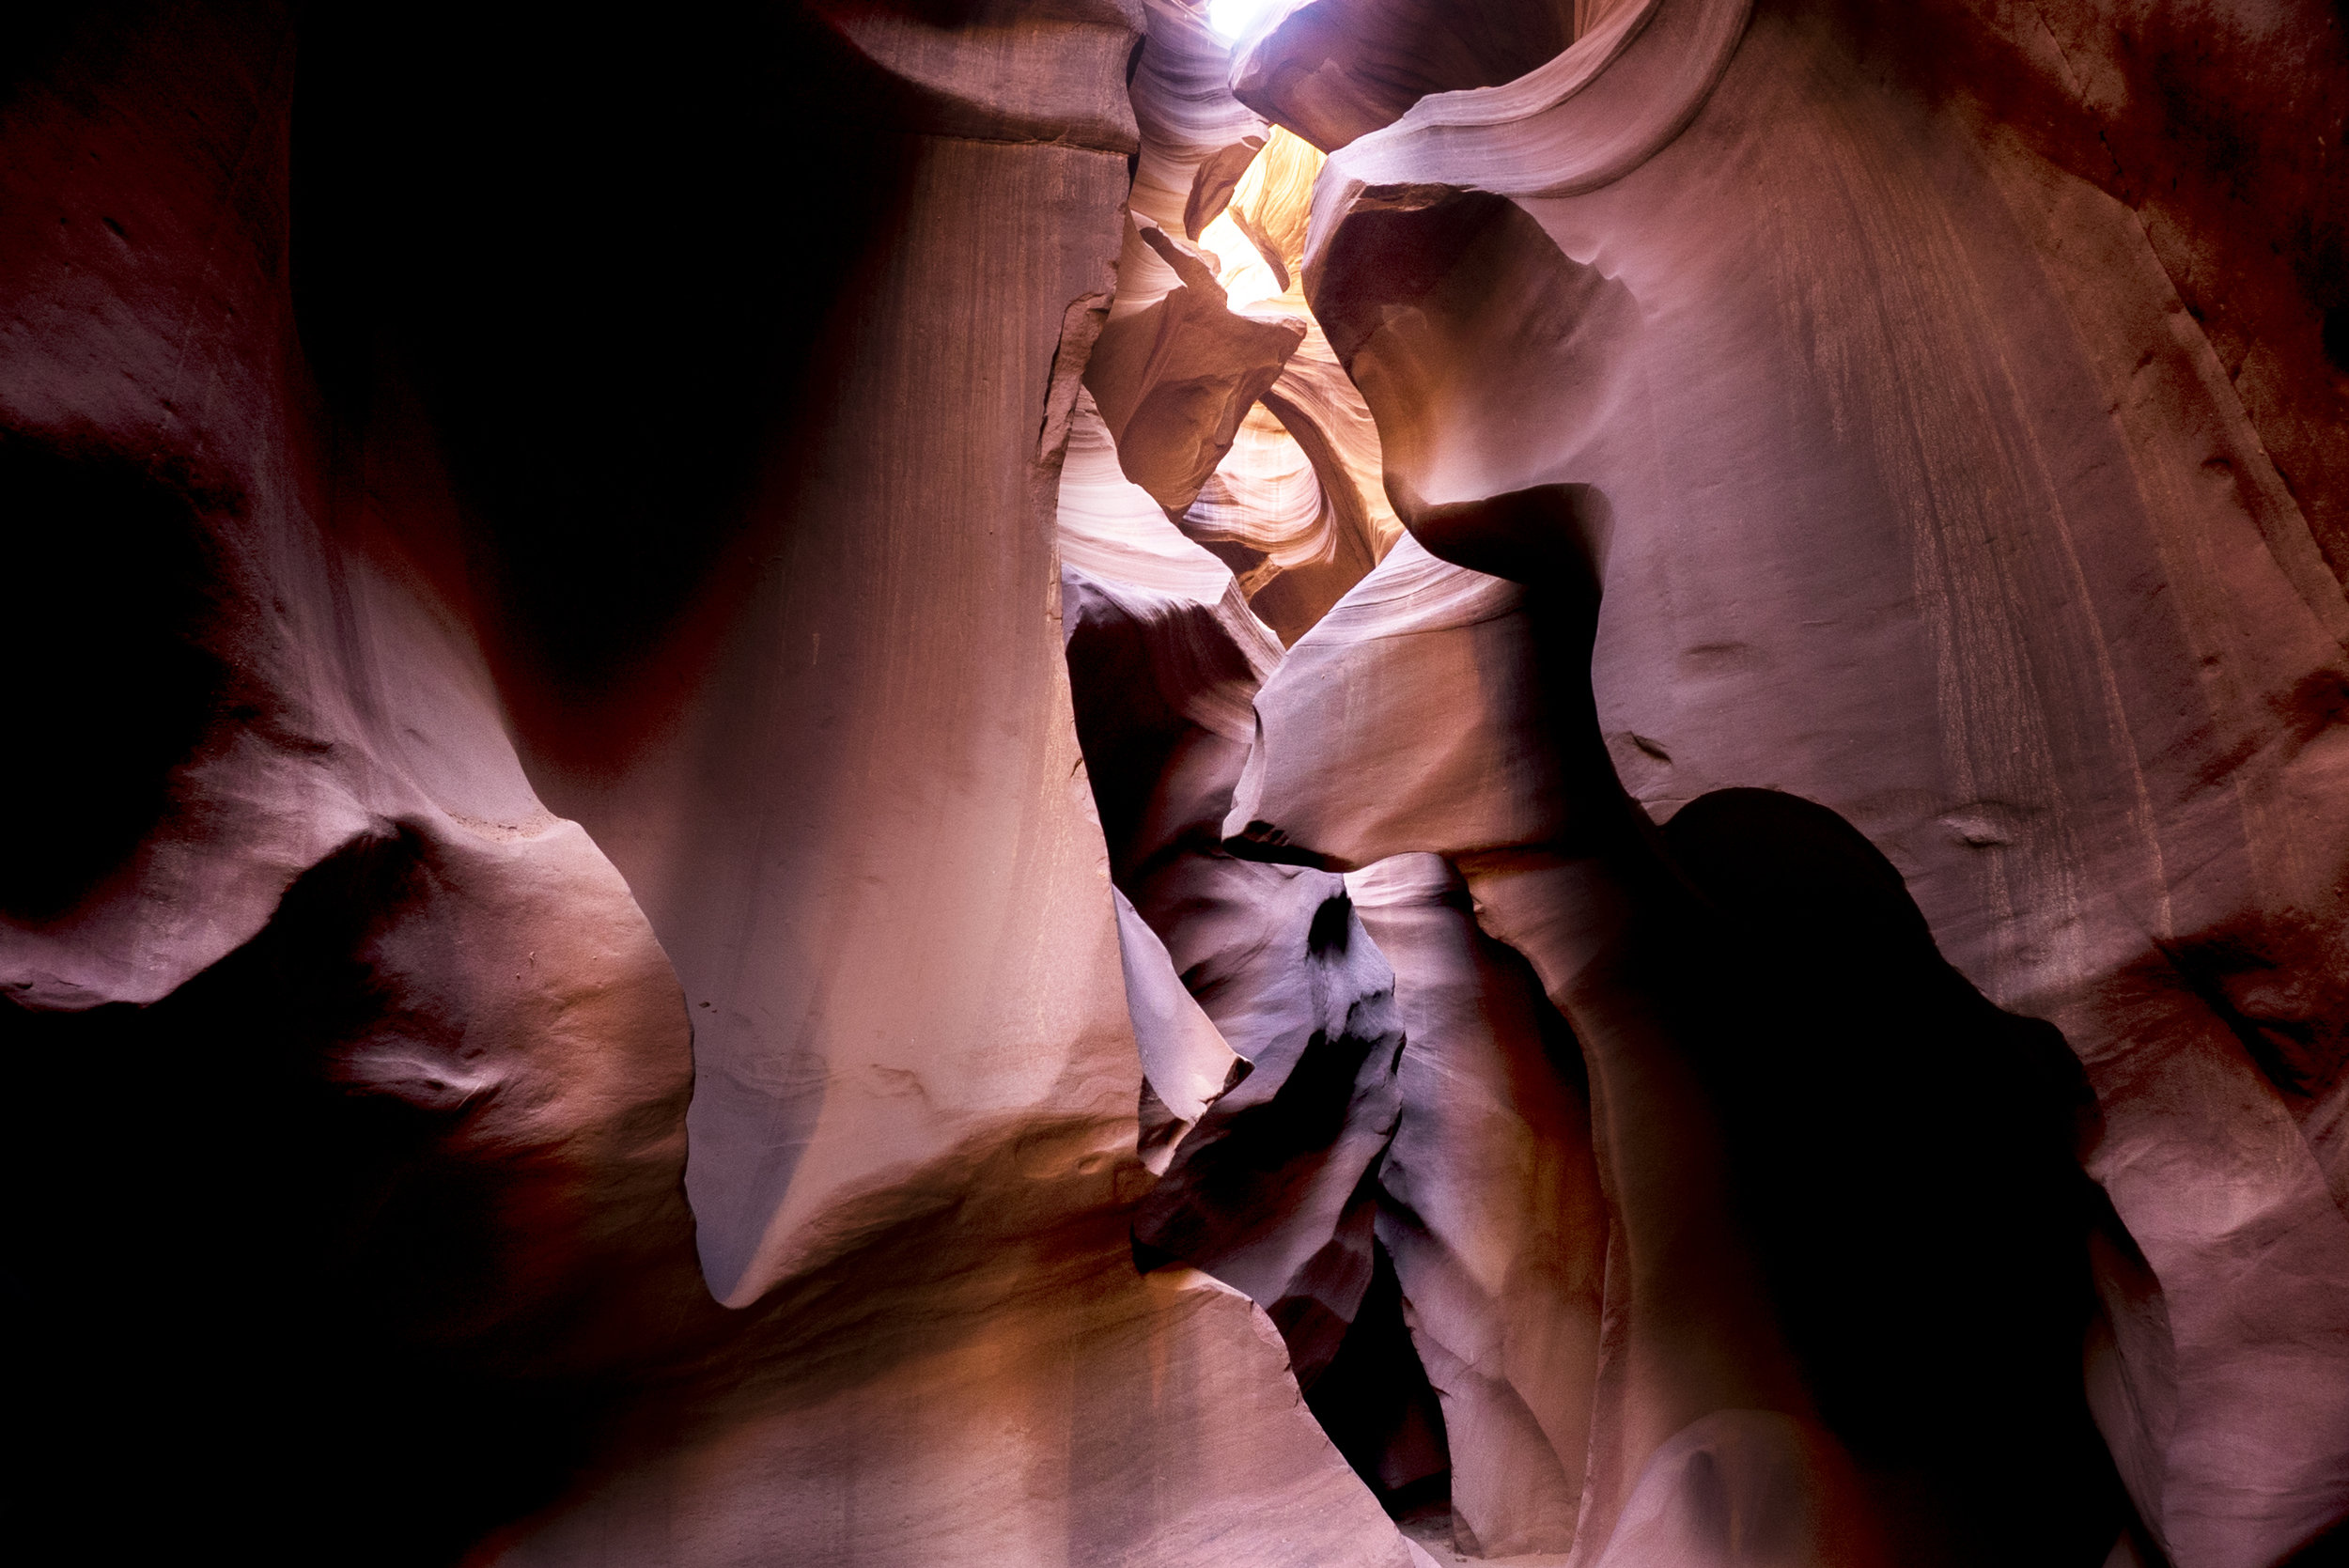
Antelope Canyon. You may not recognize the name, but you probably recognize its iconic pink and tan canyon walls with a flood of light spilling in from above. This slot canyon is one of the most photographed places for good reason! It has graced top traveling photographers Instagram feeds, National Geographic centerfolds and is even a background image included in some Windows software.
Whether you are a photographer or not, you simply must visit this tiny place in Arizona at some point in your life!
This narrow and winding slot canyon has beautifully undulating sandstone walls with changing colors of red, orange, yellow, tan, and purple as sunlight filters into the canyon at different times of day.
What to Bring:
You are definitely going to need your DSLR camera, a tripod, a cable release and some knowledge of shooting long exposures in low light.

What Settings Should I Use?
This is a manual mode photoshoot for sure and you will want to make sure you are shooting in RAW so you can make some of the necessary adjustments in photoshop later. Here are the settings we shot with and recommend:
- ISO – We have a great low-light Sony a7s camera that doesn't require a high ISO and we were very thrilled with what we got. We were able to stay at 400 ISO no problem without the image falling apart. For other DSLR cameras, you may need to go up even higher depending on your other settings. I recommend when you first get down there, find an ISO that works and keep it there for the rest of the shoot. You can always adjust your shutter to compensate for the darkness if needed.
- Shutter Speed- Because you don't have all day to set up your tripod, angle your camera and get your shot, you will need to shoot rather quickly. Extra pressure is on when a line of 10 people are waiting around the corner for you. We found that shooting at 1-3 seconds worked best for us and we could capture different angles quite quickly.
- Aperture- I prefer a lot of depth of field, so my shots were at f/18 for the most part. However, this is also a personal preference based on the look you want. I suggest playing with it for a few minutes when you first arrive and then find the f-stop that works for you before moving through the canyon.
- Tripod- Make sure you can move and position your tripod easily. Much of Lower Canyon is quite narrow and you will need to maneuver and sometimes climb. If you have a clumsy tripod, it could make your experience a bit frustrating and you will spend most of your time fumbling rather than shooting.
- Throw Some Sand – If you find a place with a great light beam, make sure you throw some sand up in the air before pressing your quick release button. It really accentuates the light and gives it an airy affect.
- Find A Sand Waterfall – Those sand waterfalls you see in the famous photos can be replicated if you find a nice ledge and have someone place a bunch of sand on it and then step out of the shot. It makes for a really beautiful image when you can do it!
- Time of Day- As mentioned below, you want the sun high in the sky like in summer, shinning brightly without interference with clouds and between the 11:00pm and 1:00pm marks. This will ensure you will get the light beams you want to see. However, even if it's a cloudy day, you can still get great shots. All of our shots were taken in winter and around 11:00am in the morning on a partially cloudy day!
- Shoot both Vertically and Horizontally- Its tempting to only shoot vertically throughout the canyon to get the long lines, but we found some really incredible shots shooting up towards the top of the canyon and horizontally.
- Take a breath and take your time- There are so many amazing hidden photos if you take the time to look around. Check out crevices, ledges, different angles, etc. Don't be afraid to get low or high. Get creative with your framing because there is so much there to work with!

Lighting makes a big difference when seeing this canyon and we definitely wanted to grab one of those famous pictures with beams of light. We learned that the best time for lighting in this canyon is mid morning and luckily many photos tours that start around 10:30AM, giving us a great chance at capturing some beams! Summertime is actually the best time of year to visit the canyon, as the sun is higher in the sky, providing more light into this narrow slit in the rocks. We happened to be there in winter, but still felt like we had a great chance at getting our shots!
Book A Photo Tour to Lower Canyon... It's Worth The Extra $
Since Antelope Canyon is on Navajo land, and because the number of visitors has dramatically increased in recent years, you must have a guide no matter what to visit either Lower Antelope or Upper Antelope Canyons.
We decided to visit Lower Antelope Canyon first and booked a photography tour with Ken’s Tours for $47/person. The only requirement was to have a DSLR camera or a mirrorless camera with interchangeable lenses and a tripod. No tag-alongs or “photo assistants” allowed as this is meant to really focus on getting your shots, rather than history or touring. We were sooooo happy we did this tour for the following reasons:
First, Lower Antelope Canyon receives way fewer visitors than the more accessible Upper Antelope tour, so there were many moments where we had the canyon area we were in all to ourselves. If another tour was behind us, our guide did an awesome job at making sure to hold people back so we got as many shots as we wanted or needed. We had ample time to set up our tripods and take long exposures to get the rich colors and ambiance just right. Plus the groups are smaller than the standard non-photo tour; ours was just the two of us and the guide, so we basically got a private tour. It felt like a VIP experience and we highly recommend Ken's Tours for photography.

Second, Lower Antelope is a one-way traffic flow. This seems unimportant until you go to Upper Antelope and its basically impossible to get any shots without several people being in it since traffic is flowing both ways.

Third, Lower Antelope is much more narrow and more windy than the open Upper Antelope Canyon. This means much more opportunity for interesting photos, textures and turns in the sandstone. Just check out some of these very different looking shots all taken within 30 yards of each other!

Both Alex and I each took hundreds of photos on this tour, and if we could have stayed longer than the 2 hours and 15 minutes that we had available, we would have captured even more! We were smiling from ear to ear the whole day!
But What If I Don't Have A Tripod?
If you don't have a tripod, you are not going to get the types of shots we have here. You definitely need to have a long exposure in the canyon because it is so dark. You do not want to use a flash for this type of scenery. So it's definitely worth it to borrow or invest in one if you want to get these kinds of shots!

Upper Canyon... A Different Experience Than Lower
After completing our photo tour in Lower Antelope, we just hadn’t had enough of the majestic sandstone canyon, so we booked a non-photo tour for Upper Antelope Canyon with Antelope Canyon Navajo Tours for that afternoon. This tour was more expensive at $40/ person for the standard tour, $120/ person if we had chosen the photographer tour again, and there were many more people on this tour.
This time, instead of having a guide take us through the canyon at our own pace, the tour group was herded along, moving quickly through the chasm as there is only 1 hour allotted for this tour. Tripods are not allowed because of the two-way flow traffic. If this had been our only tour, we would have been disappointed and would not have been able to get the shots we wanted. We did manage to get some nice selfies with our phones which were fun for social media.
However the canyon is really beautiful and big, so we wished we had done a photo tour here as well. We even got to see the spot where Peter Lik made an image that sold for $6.5 million!
Work in Photoshop!
Don't forget to do some post-production editing and enhancements in Photoshop! Sometimes just increasing the vibrance and contrast can make a huge difference! Check out these two images- the first is as shot and the second is simply enhancing exposure, vibrance, and contrast... pretty big difference, huh?!

If you don't know how to work Photoshop, I highly recommend learning! It is such a wonderful tool and once you get to know it, you have so much creative power.
--
All in all, Antelope Canyon is an incredibly magical place, and my words do not do it justice. No matter how many pictures you have seen of it, walking through it is a different experience. We were really glad we made the stop to see it, and we can’t recommend it enough!
Let us know what your tips and tricks are for getting the best shots of this slot canyon!